

We explore the importance of setting up a session and how it can improve the flow and the outcome.
Preparation
“Fail to prepare, prepare to fail” is a quote that is used often and is very true when planning your football sessions. One thing that we often concentrate on are the coaching points and details of a session that a coach wants to say, however, we often neglect the equipment needed and in what area we are working. The session can often have negative outcomes when we don't think about these things. Preparing what is needed and what you are working with will enhance your ability to step up quickly to begin you session.
The pitch
Football fields are always the same, an area with 2 goals at either end. Nevertheless, pitch diameters can change depending on the age group, or the area you have been allocated. In this article we will concentrate on a team that has half a pitch to work with, as it is probably the most common environment we work in. However, these tips can work for any area or age group you work with.
The shape of your exercises should always try to be rectangular. That is not to say that trying new shapes to test players and try new things are bad, because they are not. But always try to work on the shape of the field in a real game, which is ultimately rectangle.
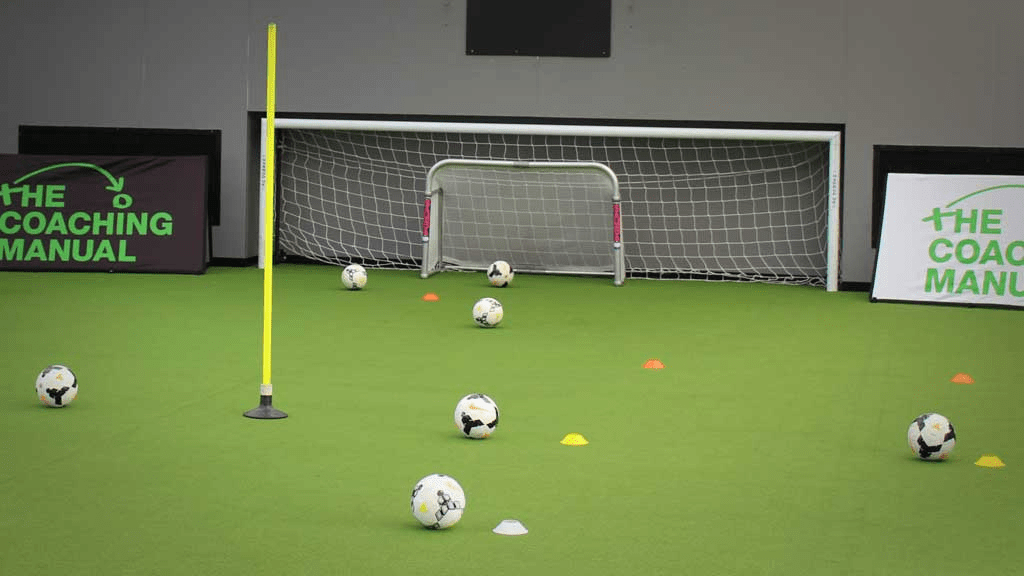
Where possible I would always try to work in the direction of the game. With attacking teams always towards a big goal and defending teams always away from the goal.
As we can see in the image above, even though the players are in a Small Sided Game they are still working in the direction of a real life game, vertically not horizontally. However some pitches have small sided goals on the side lines for you to use, again they are great to use as it has a ready made field but where possible try to use the natural direction of the field.
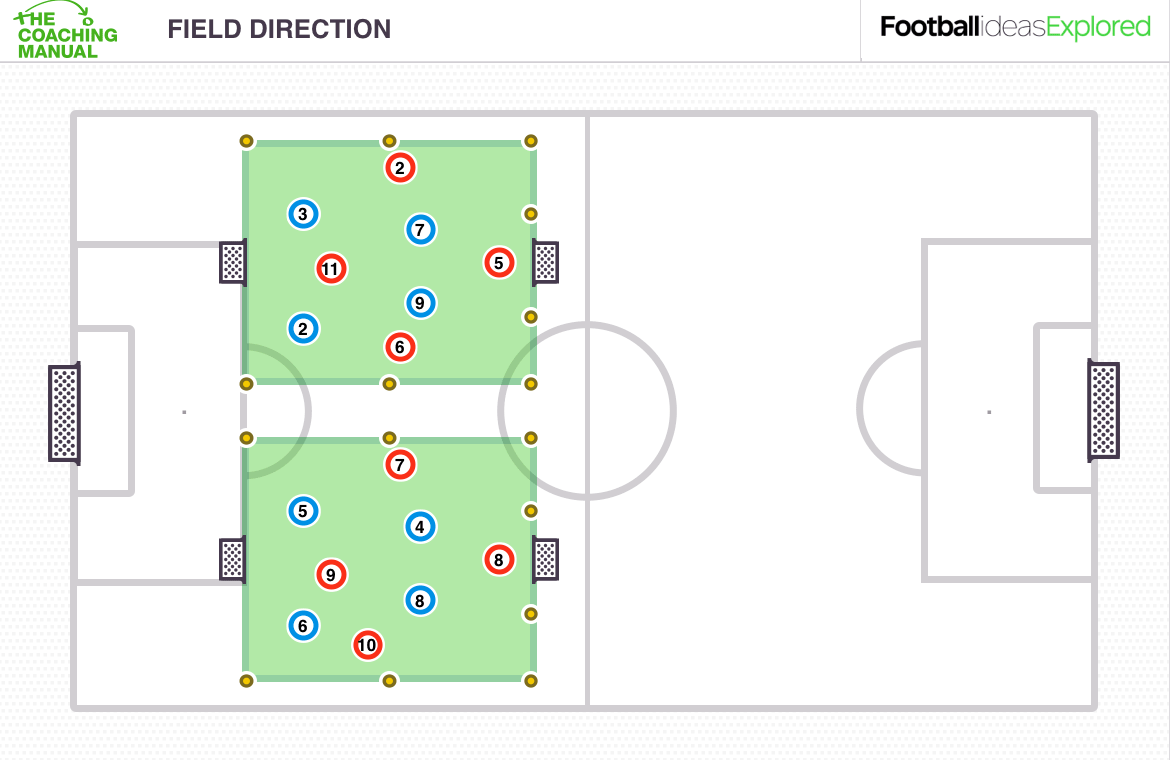
On average we can normally get two pitches in half a pitch, this is also the case for a third of a pitch depending on the original size of the full pitch and also your small sided game pitches.
Sometimes this not possible as too many players, or your activities, won"t allow this pitch size for smaller games. If, for example, we are playing 3v3 and then wanting to open it to a 6v6, we can use pitches within pitches to counter this problem.
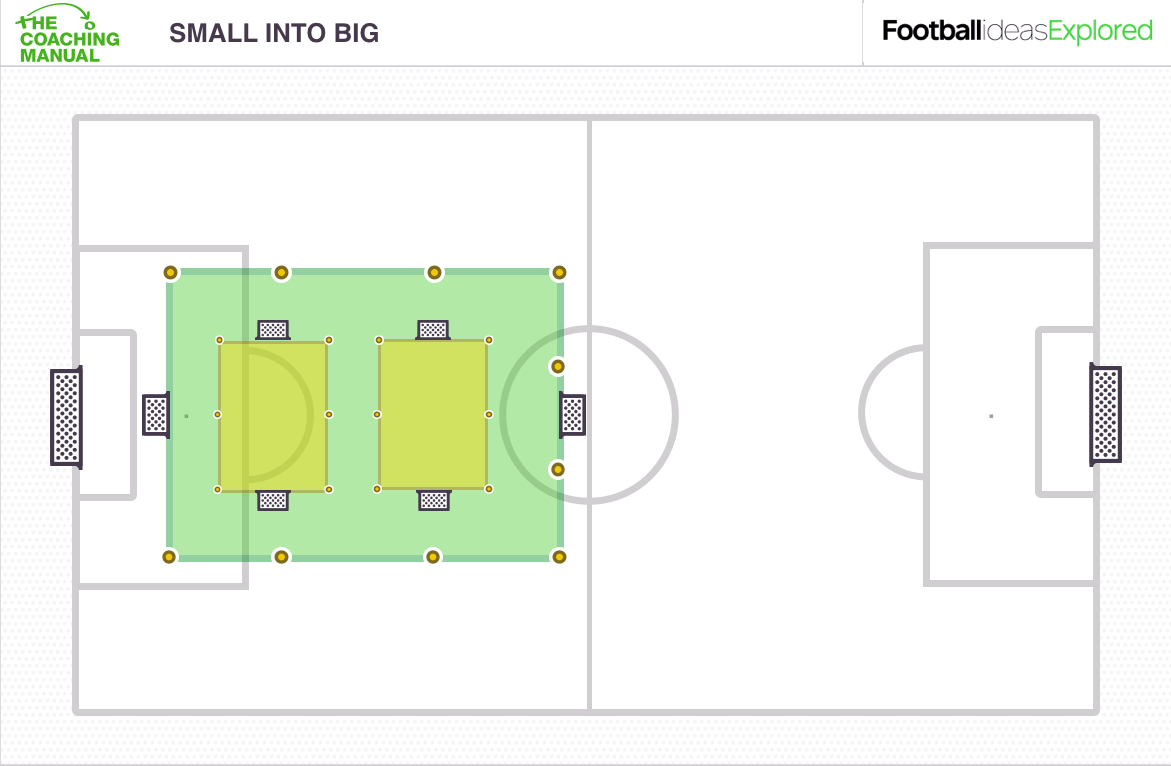
This is one of the most efficient and easiest ways to set up. It is quick and easy to organise and also cuts down time for the transition from 3v3 games/technical or skill practices to the bigger game 6v6 or 9v9, as you just take out the small goals and pitches when necessary, to leave you with the bigger pitch.
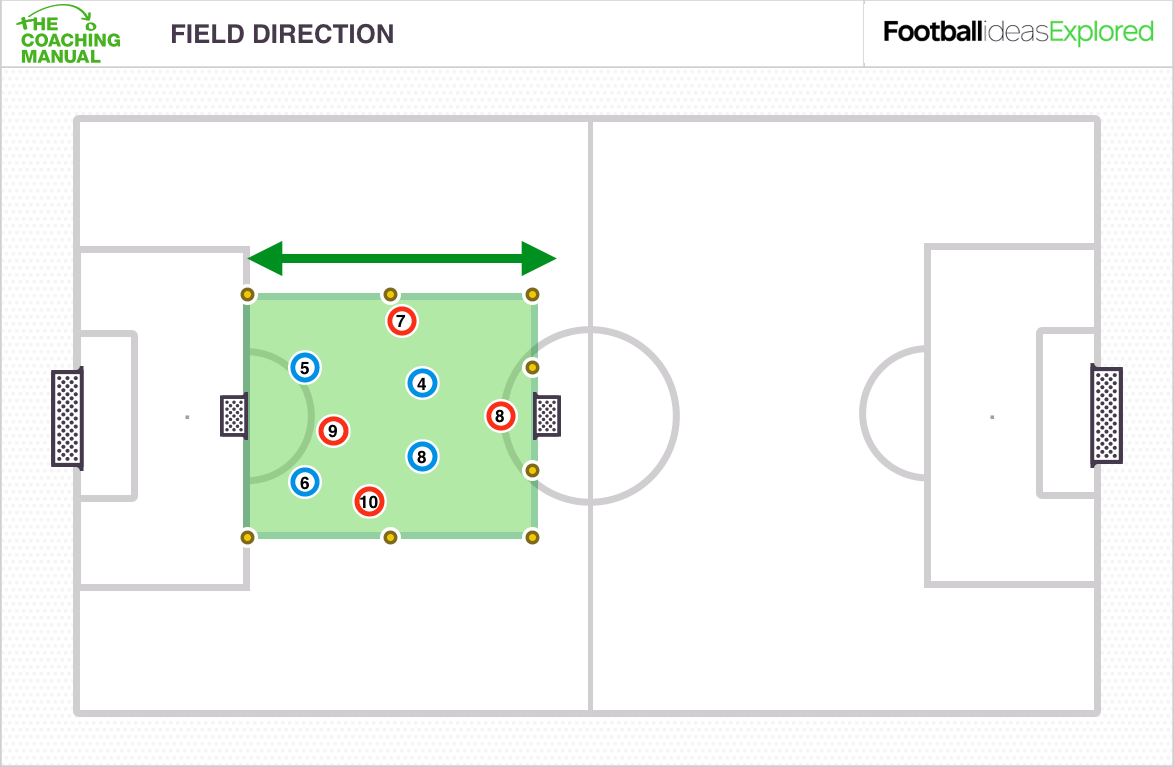
One thing that you should consider when setting up your sessions is for specific players. If you are doing player specific exercises, and also attack vs defensive style practices, you need to consider the areas where these players play and are most active. It sounds really simple, but this often gets lost in just being an "area". For example, if you are working with a winger or overlapping full back, it doesn't make sense to work with them in the centre of the field as it is unrealistic. The same as if you were working with an attacking team, you wouldn't work away from the goal. Direction and pitch references are vital when working out how to set up your session.
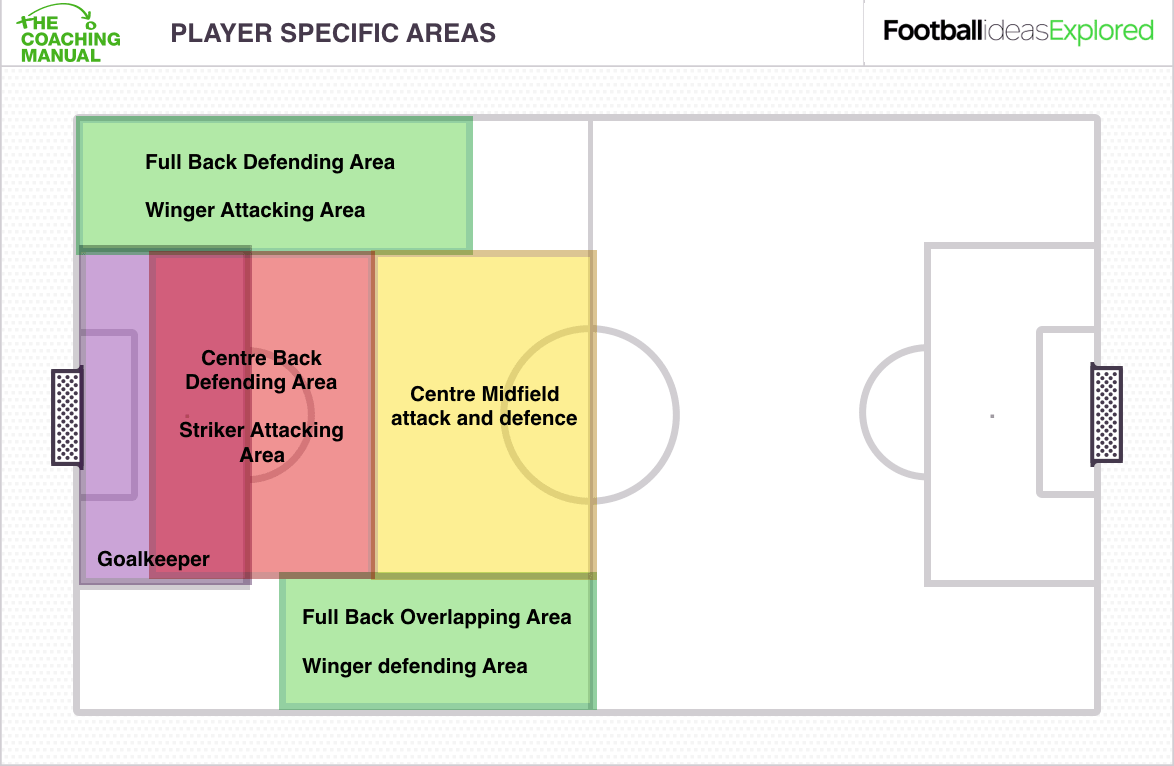
Above are some examples of how this could look for some specific positions. No doubt there are many more, but first you have to consider; What is the theme? What am I looking to get out of my player or team? What part of the field would they do it? And; how can I create my set up to help the players understand better?
When thinking about the size of the area consider the ability of your players and how difficult/easy the activity may be. It is always better to start with a slightly bigger pitch than a smaller one. The reason being is that it encourages success immediately as it is a bigger space to work in. If the players find it too easy, then you can make the area smaller to challenge the players creating positive reinforcement; "you are really good, let's make it more difficult for you." Smaller to bigger, can create negative outcomes which can diminish the performance of players, almost saying "you are not good enough on a small pitch let's open it up".
Cones and bibs (and others)
Organising the cones and bibs by colour is one way you will save a lot of time. We generally want our areas or activity zones to have the same colour, but if the bag is full odd colours on top of each other, it can be frustrating to separate them and not have them to hand when needed and also wastes time, time that could be spent with your players on more productive matters. Keeping your cones colour coordinated is a really simple and easy way to save time in your set up.
In regards to the layout of cones. One thing you should try to avoid are "runways". This means too many cones on one line of the pitch or area. For example, this would be a line of 30 yards with a cone every 5 yards (7 cones). One, it wastes cones and two it wastes time. A good tip is to put a cone down every 10 yards, so a line of 30 yards should have 4 cones. Two of those cones will act as corners if you are creating a pitch. But if the pitch is 35 yards, what do we do? If the pitch is an odd number, I would always add one cone more than the "rounded number" for example 35 yard line would have 5 cones. Then just divide the distance by the number of cones. So this example would be a cone every 7 yards.
Bibs are generally allocated to one bag, even in professional clubs. This is often a pain as we pull out one colour and there are 2 other colours stuck inside the original bib. One way of countering this is to have separate smaller bags for the bigger bag for the each individual colour. However, another way is to tie the bibs in a loose knot so the don't get tangled together. This allows them to be a bit more separate in the bag to be able to take them out easier.
With the allocation of bibs, you can do this a few ways. Lay them on the floor in the positions that the players will occupy on the pitch, this is a good way for players to see the formation and the set up of how they may play. Another good idea is to incorporate them in the warm up or by simple asking them to get in pairs with players who have a similar position to each other and give them a number 1 and 2 (or more if you require multiple bibs) and then get their designated colour according to the number (1 reds, 2 blues). If you are creating a game with floaters/magic man/free man/jokers, I would always give these bibs to them first.
Depending on your time constraints I would always try to keep equipment to a minimum. It is great to have poles and mannequins, but often the time for the set up doesn't allow you to use them.
Visuals
It is important to think about the learning styles of players when considering your preparation for a set up. Visuals are an excellent way of helping players understand the task to execute on the field. A great visual is a tablet or if you don't have that a tactics board. A tablet gives a clear understanding of how you can manipulate individual movement of players or instruct what you want to happen and also give examples if you have access to video. The tactics board can do the same the same but in a manual situation (and not having access to video content for examples). If you don't have access to this equipment, you can also use cones. If you are using cones, I would say where possible use the same colours as the bibs and also the same direction as your exercise.
Setting up
Most of the things that have been mentioned are in regards to the preparation and consideration of your set ups. However, what about when you actually get to the field?
For a lot of grassroots clubs, the team shares a pitch with other teams before and after your session. This cuts down the time you can use for setting up by a significant amount, to zero in some cases. Here are a few tips to help.
On time
Where you can you need to arrive early and set up as early as possible if the pitch is available. A recommended time to arrive could be 30 minutes before the session starts. This gives the coach the opportunity to check the equipment and set up, but also visualise what will happen in the session (the coaching points) and in the transitions. If your pitch isn't available you still need to arrive early, 20 minutes before would be a good idea. It is also always better to be there before players so you can welcome them. Obviously for grassroots coaches, it can be difficult due to work commitments, I would suggest getting there as early as possible but be prepared to start immediately.
Player involvement
If it is this case that you can"t get on the field before your allocated time, you need to be quick in your set up but also accurate. Clearly, if there are 2 coaches this is easier to manage. One can be with the players the other setting up. If you're alone however, this can be a little trickier. A good way of getting around this is to allow your players to play a small game inside a designated area. The players need to self manage this and you can supervisor from a far and check on them from time to time until you have finished the set up. This is a great way of keeping players occupied. Another way could be for your captain to lead a warm up with balls. They can take them through some dynamic stretches (if necessary) and different types of passes. We can also ask players to design 10 minutes sessions. Allowing the players to do this gives them autonomy to design something they like and gives them responsibility in a group. However, with this I would always limit their equipment, for example to 4-6 cones and 2 balls, and see what they can come up with. Giving players the opportunity to work by themselves, gives you the time to set up correctly without mistakes, whilst give autonomy and trust to players.
After the session
The next session set up always begins after your last practice. As a coach it is pivotal that you put away the equipment correctly so that the next session is just as easy to manage. I would also recommend getting the players to help, collect cones (in colour order), bibs (in a loose knot) and also the balls and any other equipment you may be using. A great way of remembering this is 'leave it how you found it'.
Setting up can sometimes be harder than we anticipate. Whether it is not enough time to do so or the inconvenience of incorrect equipment, we always have to keep things to a minimum. Always try to set up quickly and effectively, and this will only come with understanding what is needed for your sessions in your preparation stage. When thinking about the set always try to come back to "does it look like the game?".